Carabiners (Karabiner)
For the purpose of this article: Carabiner = Karabiner. Same same not different.
When entering the world of climbing it can be a little confusing as to why there are so many choices of carabiners – They all seem to look fairly similar, don’t they all do the same thing? Well yes, and no. Different shapes lend themselves to different applications. Belaying, anchoring, protection, runners and use with pulleys etc. all requires slight variations on the classic ‘D’ or oval shape carabiner. However, if necessity calls most carabiners can be used for multiple purposes.
A note about strength and safety
Carabiners are incredibly strong and as long as they are used correctly will not break.
At the end of the day all carabiners that are sold in Australia as PPE (Personal Protection Equipment) must be CE and or UIAA approved. To carry these stamps the carabiner needs to far exceed the strengths that would be generated by a falling climber when the carabiner is used correctly. The UIAA, after much testing, are convinced that a climber cannot generate more than 5kN of force. As long as you always stick to the golden rule of ‘If there is potential for a fall – there must be a dynamic link in the system between the climber and the anchor’, then this rule is very true. By ‘dynamic link’ it usually refers to a climbing rope with stretch but could also refer to Via Ferrata lanyards with shock absorbers. When you are hanging on a completely static system (eg. Dyneema lanyard to anchor bolt) there should be no slack in the system and therefore no potential for fall. The UIAA state the following:
“The UIAA standard for climbing karabiners demands a static strength of more than 20kN. This value corresponds to holding a mass of about 2 tonnes before breaking. 20kN is more than the worst conceivable fall in a climbing accident.”
Because of this incredible level of strength and redundancy built into carabiners you can be confident in them. However it is worth mentioning that if your karabiner does not carry the CE stamp with a number preceding it then don’t use it for climbing. There have been a number of times where cheap Chinese copies have made their way to the crags and they have, through testing, proved to fail at much lower forces. So always buy known climbing brands and through established Australian retailers.
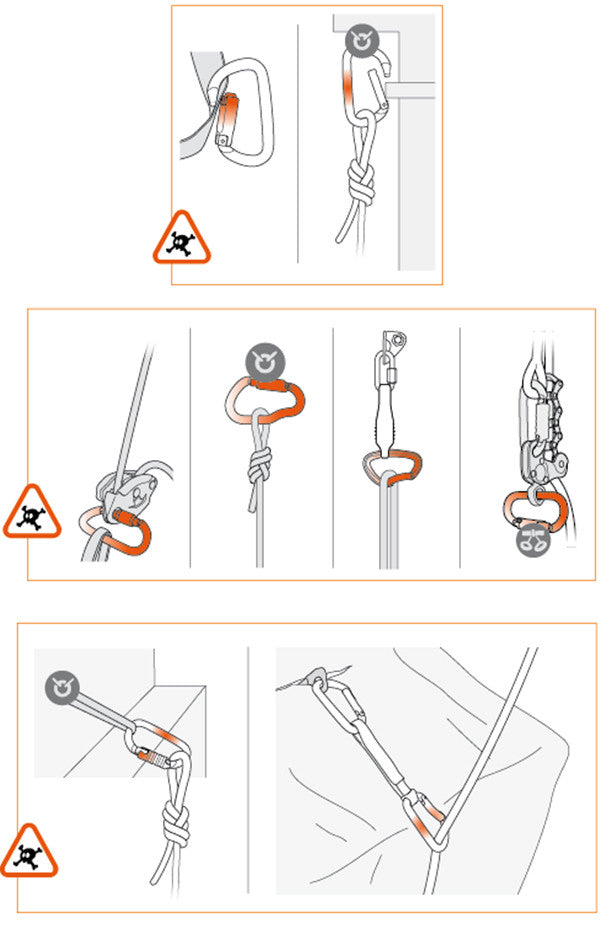
It is possible to break karabiners through misuse. There are three main ways that carabiners have been known to break in the field. The first is the nose being hooked on a bolt which loads the tip of the nose and holds the gate open at the same time. The second is cross loading the gate. The third is loading a carabiner over an edge forcing it to bend sideways like snapping a branch over your knee. While the first mentioned way of hooking the nose does dramatically reduce the strength, the second and third ways, although significantly weaker, should still take considerable force before failing. It is important when setting up your carabiners that these three scenarios cannot occur.

Shape
HMS or Belay Carabiners
Perhaps the most important carabiner you will buy is the HMS or Belay carabiner. If you’ve ever wondered – HMS stands for the German word “Halbmastwurfsicherung” which means ‘half clove hitch belay or ‘Munter Hitch’. It refers to carabiners that are designed to have rope run over them. These carabiners are usually the larger ones, are offset ‘D’ or more symmetrical ‘pear’ shaped and have a wide, smooth radius for the rope to run over. These carabiners are easy to handle, always have a locking mechanism on the gate and are kind to your rope running over them.
Examples: DMM Boa, Edelrid HMS Magnum, Wild Country Ascent HMS
So what’s with the ones with the funky shapes? This is to help prevent cross loading, as discussed earlier one of the ways which a carabiner has the potential to fail is by being cross loaded. Although a belay carabiner probably experiences the least amount of force compared to others (essentially because they are attached to a soft, dynamic object – YOU) they are the most likely to spin around and become cross loaded. As a result there are many designs of HMS carabiners that limit or totally get rid of the potential for cross loading.
Examples: Grivel Clepsidra, DMM Belay Master, Edelrid HMS Magnum FG and Edelrid HMS Strike FG
Anchoring Karabiners
Anchoring carabiners don’t need the wide and smooth rope radius like the HMS style as they don’t have rope moving over them. Because of this they can be thinner, smaller and much lighter. They are usually an offset ‘D’ shape that is wider at the gate open end and thinner at the gate hinge end and always have a locking mechanism on the gate. While a HMS carabiner will work perfectly fine as an anchoring carabiner, having specific anchoring karabiners will save a considerable amount of weight on your harness. They can also often be stronger as the design better allows loading down the spine. As anchoring carabiners aren’t moving around as much they don’t need the cross loading minimising designs of some of the HMS style. Some are much wider at the gate open end which can be useful to fit more connections onto the one carabiner.
Examples: DMM Shadow, DMM phantom, Edelrid Pure Slider

Carabiner Examples - Smaller Racking style Karabiners, and Symmetrical Oval Karabiners
Racking / Runner Carabiners
Racking carabiners are smaller again than anchoring carabiners and typically are found on quickdraws, slings or camming devices. They are ‘snap’ gates and therefore have no locking mechanism on the gate other than the spring on the gate itself keeping it closed. The general rule is ‘only use racking (snap-gate) carabiners if that connection is redundant’, or in other words – something else is there to back it up. Because of this they are typically used for protection when a climber is leading a route. In this process many pieces of gear are placed and if one was to come unclipped (although very uncommon) it would not result in catastrophic failure. Racking/runner/snap-gate carabiners are very useful as they are lightweight and are quick and easy to put on and off, but they shouldn’t be used as a climber’s singular point of attachment to a cliff.
Examples: DMM Aero Bent Gate, Wild Country Helium Clean-Wire, Edelrid Pure Straight Gate
Oval Carabiners
Once the hallmark of climbing, oval carabiners are rarely used these days largely to the fact that they are heavier and not as strong as their offset ‘D’ or ‘pear’ shaped modern descendents. They are symmetrical in shape causing equal loading on the gate and spine sides of the carabiner. They come in both snap-gate and locking gate configurations. The most common reason to buy an oval carabiner these days is to rack up nuts or stoppers, because of its symmetrical shape it is easy to spin it around to find the correct size of protection you need. The second is to hold a pulley – as it is symmetrical the pulley will not sit against the spine or gate of the carabiner but always stay centred. The third most popular reason is when aid climbing for your etriers. Similar to the reasoning of the pulley, the etrier will always sit centred on the carabiner and won’t shift around, making weighting a piece of gear on them more predictable.
Examples: DMM Ultra O, Black Diamond Oval Wire Gate

Intergrated Pulley Carabiner Examples - DMM Revolver in snap and screw gates
Integrated Pulley Carabiners
A recent addition to the carabiner range is the specialist pulley style. These come in both snap and locking gate configurations, usually are an offset ‘D’ shape and feature a pulley wheel embedded at the gate open end. They are very useful for two main applications – a lightweight multipurpose carabiner in a rescue set up to replace a traditional pulley. As it can double as an anchoring carabiner you can save some weight by having it dual purpose. Secondly, on wandering routes or in roofs where the rope direction changes, a snap-gate pulley style carabiner used as the bottom karabiner on a quickdraw can greatly reduce rope drag.
Examples: DMM Revolver Snap gate, DMM Revolver Screw Gate

Gate Locking Mechanisms
It is important to remember that a carabiner is only rated to its full strength when the gate is closed. When the gate is open it is usually only about 1/3 of its complete strength. As such there are options to ensure the gate stays closed for different applications.
Snap-gates
As discussed above, snap-gates are easy to place and remove, lightweight and small. However they should be used where they could be considered at least semi-redundant. Typically they are used to link many items of protection together. Because of their weight they are often carried as emergency bail carabiners however it is strongly recommended that a climber never uses a snap-gate as their sole connection to the wall. A snap-gate carabiner will never open on its own however other things like the rock or another rope pushing against the carabiner from the outside can open the gate.
There is the choice between solid gate snap-gates and wire gate snap-gates. Generally the advantage of solid snap gates is that they can be more ergonomically shaped and therefore be easier to clip and handle. Most are ‘clean nose’ these days so snagging slings and gear is a thing of the past. It is also important to use solid gates when attaching them to removable bolt plates with Australian and New Zealand ‘carrot’ bolted routes as the volume in the gates prevents them from coming off.
Example: DMM Aero Straight Gate
Wire gates are lighter and just as strong. Apart from their lower weight they have the advantage that because of their low gate mass, the gate cannot be flicked or vibrated open during a fall (this is known as ‘gate flutter’). In alpine scenarios wire gates are less susceptible to freezing shut as there is less surface area for the ice to stick to.
Examples: Edelrid 19 G, Edelrid Mission Wire Gate, Wild Country Helium Clean Nose
After looking into it you will notice snap-gates come in a ‘straight’ gate and ‘bent’ gate configurations. The main reason behind this is to distinguish which carabiner attaches to hardware and which attaches to the ropes. The straight gate is reserved purely for attaching to hardware like bolts and nuts or any metal objects. They, after a while will get a little scratched up on the inside of the carabiner from all the rubbing on metal and although not a strength concern, if a rope was to run over that scratched up surface would cause unnecessary wear on your rope. The bent gate never attaches to metal objects but is kept solely for clipping into the rope. The slight bend in the gate has the advantage of making it easier to clip the rope into
Examples: DMM Alpha Bent Gate, DMM Alpha Straight Gate
Screw Gates
The tried and true method of ensuring the carabiner doesn’t open when you don’t want it to. The great thing about screw gates is that they don’t automatically lock so they are very easy to get on and off your harness in their un-locked position and then can be locked when required. The thing to consider though is that they don’t automatically lock so the responsibility falls to the climber to ensure they always lock their carabiners when in use.
Examples: DMM Sentinal Screw Gate, Edelrid HMS Magnum Screw Gate
Spring-loaded Locking Gates
Spring loaded gates (also known as auto-locking gates) are great for non-redundant points where it is crucial that the carabiner always be closed. These are particularly useful for your HMS or belay carabiner, or your personal anchor carabiner. It is useful to practice getting them on and off your harness as they auto-lock when racked as well so they can be tricky if you’re not used to the mechanism. Spring-loaded gates come in two main configurations – double lock (or quick-lock) which requires two movements to open (twist, open) and triple lock which requires three movements to open (push up, twist, open).
Example: DMM Rhino HMS Quicklock
Double Snap Gates
Relatively new to the market, the double snap-gate has the advantage of an auto-locking gate with the added bonus that one gate is always shut meaning the carabiner is always in its strongest position.
Example: Grivel Clepsydra
Slide-lock gates
Exclusive to Edelrid these auto-locking gates are very lightweight, low bulk and easy to open.
Examples: Edelrid Pure Slider, Edelrid Strike Slider
Magnetic Gates
Exclusive to Black Diamond the magnetic auto-locking gates are also easy to open, particularly with gloves on. It is important however to keep the magnets very clean as there is only a very small clearance between the magnet and the metal it connects to. Dust and grit can get in between and causes it to get quite ‘gritty’.
Examples: Black Diamond Magnetron
Aluminium vs. Steel
This is not really even a consideration for climbers as steel is much too heavy and is unnecessary for our applications. Steel carabiners are generally cheaper to manufacture and are created for industrial purposes with strengths of up to 60kN. Considering the minimum rating on an aluminium carabiner is more than three times the force that a climber can generate it is not necessary to go beyond that. Steel karabiners can be useful for fixed gear as they can be more resistant to rope wear however for 99.9% of recreational climbing applications the aluminium carabiners are the best option.
Basic Shape and Forged Shape Carabiners
This is a question that really comes down to budget vs. weight. Traditionally carabiners are manufactured using a section of alloy rod that is bent into the desired shape, then the nose and gate hinge are machined and gate added. These carabiners are cheaper to make but are also heavier. Forging a carabiner, either using hot or cold methods can produce much more elaborate shapes. Metal can be removed where it is not structurally needed, thus producing the typical ‘I-beam’ look. These carabiners are usually slightly more expensive, however they are lighter, can often be stronger and have more elaborate and ergonomic shapes.
So just like the wheel, the humble carabiner, the links that help us climbers safely navigate our way in the mountains has been reinvented a thousand times. Although they all achieve the same thing certain designs lend themselves to certain jobs much better. In time you will learn what you like however to begin with if you aim to accumulate the following:
1 x HMS Belay carabiner
3-4 x Anchoring carabiners
20 x Snap-gate carabiners organised into 10 quickdraws (2 snap gates joined by a short sling)
Then you will have yourself covered for most general sport climbing routes or a good base for your trad career.